On this page
Selecting images
Image size / dimensions
It is recommended that banner images need to be at least 1920px wide by 1280px high. This will ensure that the image is not too low resolution which would result in a blurry or pixellated image. Further guidance about image sizes and proportions can be found in the useful guides below:
Recommended tools to edit images
It can be tricky to know what tools to use for editing images. That’s why we’ve put together the following list of recommendations
- Web and Learning Development’s own Image Editor – Image Editor
- Image editing, resizing, and compression – https://www.iloveimg.com/
- Image compression – https://compressjpeg.com/
- PDF splitting, merging, compression – https://www.ilovepdf.com/
See also
Stock image libraries
It can be tricky to find suitable imagery for your site and not everyone has access to a paid licence for image libraries such as Shutterstock, so here are a few suggestions of free image libraries you can check out:
- Unsplash
- Burst
- Pexels
- Pixabay
- Freeimages
- Kaboompics
- StockSnap
- Canva
- Adobe Stock
- Negative Space
- Pik Wizard
- Gratisography
- Life of Pix
Maximum file size
The maximum file size you can upload to your website is 2Mb. If your file is over this size consider trying to compress it using some of the tools listed above or compressing it into a zip file.
Alternative (alt) text
“Alt text describes the appearance or function of an image on a page. Alt text is read aloud by screen readers used by visually impaired users, displays in place of an image if it fails to load and is indexed by search engine bots to better understand the content of your page.”
Source: Moz.com, AltText
Most images on a website should have alt text applied to them to help users with accessibility issues. Thankfully in WordPress it is very easy to add / edit alt text on an image.
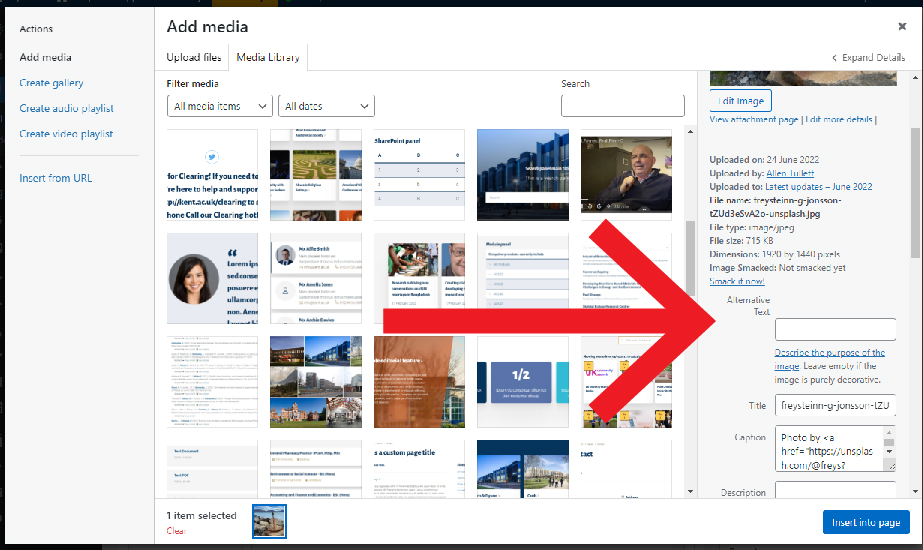
If you are in the media library section of your site you can click on the relevant image which will load a details panel on the right side of the screen. Here you can edit all of the details for that particular image, including adding / editing the alt text value.

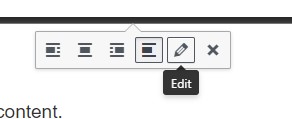
 If you are on a page / post and have an image already on the page, first click on the image and you should see some options appear beneath. Click on the pen ‘Edit’ button. This will open the ‘Image details’ window, allowing you to edit the image’s alt text.
It can be difficult to determine if an image should have alt text applied. The W3C Web Accessibility Initiative (WAI) have a useful decision tree tool to help you in making a determination.
Listed below are a few useful links to pages giving further guidance about alt text and as well as some best practice examples:
- WebAIM – Alternative text
- AbilityNet – Five golden rules for compliant alt text
- Siteimprove – Accessibility: Image Alt text best practices
Crediting images
Feature panels

When using a a feature panel, if you need to include a credit to the source ensure you add the relevant text in the ‘Description’ field on the image details.
It is possible to copy and paste in HTML, if you wished to include a hyperlink to a source web page.
Captions (In page content)
 Captions are managed by the ‘Caption’ field on the image details. They are displayed as a small text label underneath the image.